
Germination tips using the Aurora+
Some of the most commonly germinated seeds in the Aurora+ have a thick pericarp. This will review some common suggestions meant to help you maximize your success. Not all recommendations will work for all seeds as nature can be influenced by a number of factors. Please observe all laws and regulations regarding cultivation and propagation.
Getting Started
For older seeds, start by lining a clean pill bottle or matchbox with a fine-grit sandpaper. Place your seeds inside and gently shake them for 30-60 seconds. The goal here is to make small scratches in the outer layer of the pericarp which will help moisture penetrate. Some even like to lightly scratch the pointed end of a seed against fine-grit sandpaper.
Germination Solution
Next, let's talk about your germination solution. You can use tap water (varying by location), distilled water, hydrogen peroxide solution, Epsom salt solution, and many others. Depending on the source, some tap water could contain too much chlorine and fluoride. Leaving it out and uncovered for 72 hrs will allow some of it dissipate. An air stone will speed the process and aerate the water. Some areas like Arizona, use chloramine, which does not dissipate naturally and may need a dechlorinating additive. Well water (also varying by location) can have a higher pH, especially in areas with a lot of limestone. The germination process requires a slightly acidic environment. Distilled water is good as a sterile base and starts at a neutral pH of 7. Though that can fluctuate based on how long it has been exposed to the air as it absorbs carbon dioxide, oftentimes falling to a pH around 5.8. However, water on the slightly acidic side can aid in breaking down the pericarp.
Using a 1% hydrogen peroxide solution can also aid in softening the outer shell as well as sanitizing and oxygenating. Just combine 2 parts distilled water with 1 part hydrogen peroxide 3%.
Epsom salt for seed germination is an old-school method not found in many modern gardening publications. Magnesium sulfate activates enzymes within the seed, instructing it to consume the nutrients stored within, thus starting germination. A solution of 1 tsp per gallon of water should be sufficient.
Others utilize aloe, humic and fulvic acids (like Recharge) or even mycorrhizae products. Cannomic makes a germination solution multiple customers use. Some also use Qualiterps germination solution.
To soak or not to soak? That is the question...
At this stage, some like to soak their seeds for a few hours up to an entire day. Depending on the type of seed, this may have adverse effects. It is not necessary to pre-soak your seeds with the Aurora+ as long as you keep the germination pods adequately hydrated.
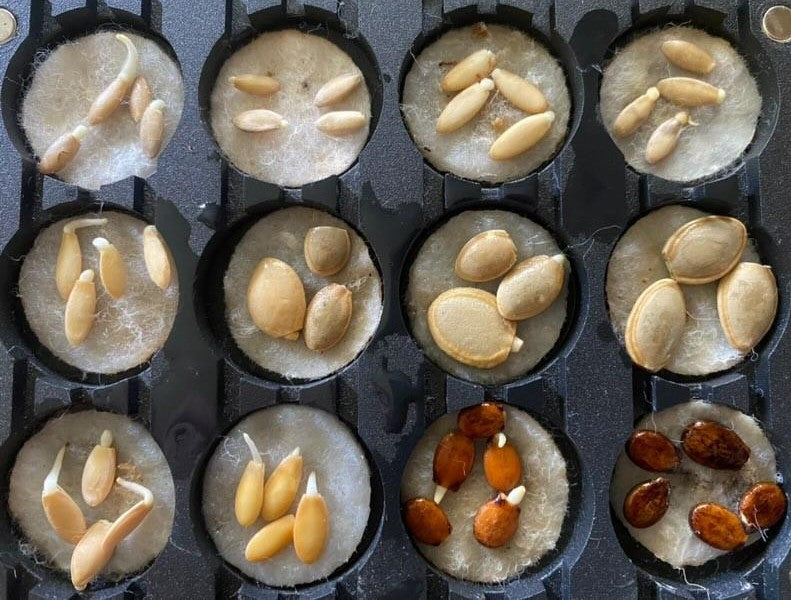
Load it up!
-Place a cotton pad into each desired pod (utilizing center pods for heat and moisture efficiency if not using all), then place your seeds on top.
-Use another cotton pad to cover your seeds and add 2-3 ml of your germination solution to each occupied pod. More seeds per pod will require more germination solution and more frequent hydration, just be careful not to drown them. 2-3ml for 1-4 small seeds should last approximately 24-48 hours on the higher, flashing light setting before needing rehydration.
-Some users prefer to add half of the solution before placing the second pad on top with the rest added after.
-Gently use your tweezers to press down on the outer edges of the top pad to seal your seeds inside. You could also skip the cotton and place your seeds directly into the pod. Exercise caution with the amount of solution to avoid spilling and water damage.
-Gently slide the lid on and allow the magnets to lock it in pace. Plug in your Aurora+ and select the proper temperature setting for the type of seeds being germinated. The solid green light indicates the 75-77F setting. The flashing green light indicates the 80-82F setting. To change the setting, simply unplug your Aurora+, wait a second and plug it back in. Make sure you're using the stick on feet for the bottom to avoid heat loss.
Depending on the type of seed, you may want to check every 12-24 hours for potential tap roots. Various types of pepper seeds can take weeks or even MONTHS to germinate. Some types of healthy, properly stored seeds can germinate in 24-72 hours. Older seeds, or those not stored properly, can take significantly longer. The longer the germination period, the more vulnerable they are.
Good luck and happy growing!
Photo credit: @BofMD_hotpeppers.